Sunday, December 23, 2007

Stockings are hung...

Yes, I have been busy readying for Santa to visit. Unlike sooo many of you, I am sure.
We have lots of pretty gifties around the tree and I need to wrap only the gifts for my husband's sister and her husband. They will be joining us for our traditional Christmas Morning Margaritas & Monster Movies. (We have no little ones, so we get to celebrate however we want!)
(These are the stockings we put up this year- the Snowman: the one I received this year from Swap; Blue Santa Pants: my original stocking from my childhood; the Gingerbread: from last year's swap; Red with Star: my darling husband's stocking. Plus some cute things and candles.)

Anyway, what with all the last minute projects to complete, things to mail, work to finish up, there has been no time to create new Gifties, photo them, write a How To and Post! Yes, whine, whine, whine.

So I decided to post a couple pictures of my tree and my mantle, since I am seeing so many on other blogs.

(Our tree is a little 4 foot fake tree that goes up in about 20 minutes and tears down even faster. When we moved into our home, we realized this little cutout between the living room and dining room is EXACTLY they right size.
So we can never move. This is just too easy.)
What does your tree look like?
Put a link to your pictures in the comments, so we can all see!

Sunday, December 16, 2007

Tiny Trees


I seem to be awfully taken with little stuffed things. I have even used an old quilt revenant, made it into a pillow, turned it, stuffed it and shoved it into a cardboard-box-cave for my cat-monster-Louis to sleep in! When he tires of the sofa, of course.


But when I spotted these delightful little trees on Natalie's Chicken Blog, I decided I absolutely MUST make some. (Go see what other wonderful things she has posted. Really a great Blog-find.) She was kind enough to email me a link to the tutorial she found hers on, Thanks!

These would be wonderful along your mantle, maybe interspersed with those Wowls and some garland or lights. (I recently googled my name, and to my never ending shame and horror, I discovered I use the word "cute" in almost every comment I leave behind. I fear I make squeaky happy noises when I discover these things too.) I can easily imagine their use throughout the gray winter months, simply by changing the accompaniment for each holiday.


The trees are quite simple to construct, especially if you use a felted material, or other that won't fray too terribly. And they lend themselves to any sort of decorative embellishment you might choose. In fact, these are the perfect project for rummaging through your buttons and beads, depending on the effect. And a whole forest could support almost any style you wish to try.(I have also noticed a new tendency to overuse the exclamation point. Even two or three at a time. In a SINGLE paragraph.)

So, Let us make some delightfully whimsical soft sculpture trees:

The tree is made up of 2 parts:
Cone and base.

Simply use a string and a pencil to draw a circle on some fabric and cut out.
You then cut this circle into either 2 or 3 sections, and you will have fabric for the two or three cones.
Depending on how thick your decorative bits are, you may wish to embellish the fabric at this point, instead of waiting for the tree to be sewn together and stuffed.
For the base, take the same string and measure the bottom edge of the section, which was the outside edge of the circle. That is the measurement of the base you need to cut- the string makes a handy circle to trace around.

To Sew:
I find it easiest to to sew from the top of the tree (right sides together) about 1/3 down, leave a 1/3 gap, then sew the bottom 1/3 together.
Then join the base and the tree (right sides together again).
This leaves a gap mid-tree to turn your project and stuff it.
Then use an invisible stitch to close.
Voila!


This is a project for Thrifty Gift Chat, hosted at QuiltChat, a wonderful community of quilty folk from around the globe. Come check us out and say hi!

Saturday, December 15, 2007

Stocking Swapped!

The Chatter-ers of Quiltchat.com just did our annual secret santa stocking swap, and I got this great haul from a friend in Texas!
Thank you so much to my secret Santa. I received a really top-quality LARGE stocking (shown here hanging on my mantle) with a big old snowman and shiny things. And she actually managed to put ALL the little fun things inside!


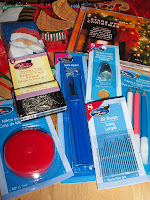
She filled it with lots & lots of good back up supplies: quilter's T-pins (really appreciated!!!), thimble, measuring tape, plus some Dressmaker's chalk pencils in different colors- I needed those!
Of course some nice fabric, some cute Santa tissues, a CD of Christmas classics, a handful of Candy Canes, a really cute tealight holder and a funny little ornament.

Thank you txstitches!

I think the first thing I will use, after eating a Candy Cane of course... is the Dressmaker's chalk- I have this chalkboard fabric I have been itching to play with :)

Saturday, December 8, 2007

Reversible Tote, with pockets

I love all the fun, new, retro fabrics out and available right now.
They just make me smile!
So I decided to make a reversible tote using three of my favorite fabrics in my stash. (Yes, yes. I was supposed to be be working on a another project, and I shouldn't have started something new, yada yada yada. Get off my back- Sheesh!)


This is a bag you can make in an afternoon, and the directions below are for the simpler version, with some pointers for making the little special bits that I chose.

You will need at least 2 complimentary, contrasting fabrics.


Straps & Pockets:
As you may notice in the photos, I chose to use a third fabric that was complimentary to both my tote fabrics.


For the Straps, I cut 2 pieces approximately 4 inches by 40.
Working with one strap at a time, turn right sides together lengthwise and seam the raw edge so you have a tube.
Turn the tube right side out, and press.
Repeat with second strap.


For pockets, cut pieces approximately 5 inches by 5 inches, and turn the edges under twice, stitching down for stability.

Tote Body:
Work with each fabric and do exactly these same steps for both.


Cut fabric 26 inches by 16 inches
Fold right sides together and sew a seam along both sides, leaving the top open (opposite the fold/bottom). You may choose to sew off each corner at a 45 degree angle, to give a 'bottom' to the tote. Just make sure you
Turn top, raw edge under 3/8 inch and sew seam all the way around.
(You would now add the pocket, by simply sewing it into place where you want it. Be careful to sew pretty! Everyone will see this stitching.)


Now you join the bags:


Turn one of the bag layers Right Sides out.
Place the other bag layer inside the first and match the top edges, pinning every couple inches.
Place the strap ends between the two layers and pin in place. (I measured 3 1/2 inches from the sides.)
Stitch both layers together, all the way around, making sure you keep the fabric evenly fed. (The extra pinning will help keep it even. An even feed foot may help too.)
Sew a second line of stiching slightly inside from your original line.
You may also choose to add more stitching to the bottoms of each bag handle.


And there you have a darling, reversible tote!
Now you just have to fill it with something. Maybe you need to go Fabric Shopping!


This is another project for Thrifty Gift Maker hour, a live online chat held at #QuiltChat I host. All quilty-crafty types are welcome to join in the fun! Gift Maker Chat is on Sundays @ 7 pm & Mondays @ 10 am EST, but there are usually folks in around the clock, as we have friends from around the globe.

Sunday, December 2, 2007

Quilty Ornaments

Are you looking for a way to add your quilty-ness to your Christmassy decor?
Howsabout an ornament!

Even if you don't want to cover your family tree with them, maybe that philodendron in your sewing room could use some holiday cheer! Or maybe you just need a something to hang from the curtain rods.

Whatever your needs- ornaments will fill them!

Look here at Auntbekky's blog for quick How-To!
Have Fun!

This is another project for Thrifty Gift Maker hour, a live online chat held at #QuiltChat I host. All quilty-crafty types are welcome to join in the fun! Gift Maker Chat is on Sundays @ 7 pm & Mondays @ 10 am EST, but there are usually folks in around the clock, as we have friends from around the globe.